Devlog - Creating a Game from Scratch in Unreal Engine 5: Character Movement and Introduction of a HUD using Blueprints
Hello, world. This post is the first of what, I hope, will be many entries into a devlog where I’ll journal on my family, work, and endeavors to build and release an experience for you to play.
I’ll plan to post content in the following formula which aligns with my values:
- Family
- Accomplishment
- Continuous Learning
Family Update #
My wife has nearly healed up from surgery this week, and we expect her to return to work soon. My mother is adjusting well; it seems — as we all are — to the recent death of my father. My daughter has learned to open childproof lids on medicines at the healthy age of six.
For me, physical health has been poor this week. I took Thursday and Friday off to rest. I’ve been pushing too hard. I had worked 40 hours by the time I signed off on Wednesday, and my body let me know I needed to take a rest. I won’t go into details here other than to say: take care of yourself.
GameDev Accomplishments #
The last week has been productive:
- Registered a domain
calltomain.com, which reflects themainentry point of many computer languages while allowing for some playful expression ofaiwithin the wordmain. Thanks to my wife for helping me pluck something I said out of the air to find this name. - Registered a domain,
crazedfan.gameswhich is the handle I’ve used since first getting online in the mid-1990s. “CrazedFan” has been my alias since joining Usenet in the early 90s, to leading the Abyss of Pandemonium total conversion for Quake in 1996-97 as a teenager, and playing all the games I’ve played. So CrazedFan Games is the perfect marquee. - Revised (again) a draft of the story for Call to Main. With each iteration, I recognize the story is getting more straightforward and more impactful. I won’t talk about the story much here, as I’d like it to be a surprise. Refining characters, motivations, cornerstones, and more will take quite a bit of work. Building a game takes a lot of time, and I’ll keep alternating on development and backstory.
- Concept: Using Figma, I outlined the second complete draft of a world map and built out a mood board for several areas of the world. This latest iteration kept with the previous attempts and iterations. I’m satisfied with the outline and need to continue to iterate to refine.
- Built significant confidence in using Unreal Engine 5 — I found some concept art and built it out this morning in Unreal. I’m still struggling with scale, but my vision blocked out well. Today was the first day I modeled something to my satisfaction in a very long time (20 years).
How do you set up a new blank project in Unreal Engine (UE5)? #
In recent weeks, I’ve made progress learning how to blockout levels within Unreal Engine 5. Now, I’ve set my goal on learning to establish raw game mechanics. However, I won’t effectively block out levels if I don’t understand how my player moves. Can they jump? Double jump? Jump far? Run fast?
Why create a blank project instead of basing things on the First-Person or Third-Person templates? Good question. I want to learn everything and avoid starting with bloated code or blueprints I don’t understand.
- Create a blank
New Project - Create a new folder in the
Content Browser— Tip, you canChoose a Colorto help you visually reference, which is helpful given all the content and restrictions in structure (some things want to be at the root of content. - Create the following Blueprints where
{Dir}is your choice to organize your content separate from default engine content or later third-party stuff you download:- Game Mode Base as
Content/{Dir}/Blueprints/BP_GameModeBase. A GameMode - Player Controller as
Content/{Dir}/Blueprints/BP_PlayerController - HUD as
Content/{Dir}/Blueprints/BP_HUD - Character as
Content/{Dir}/Character/BP_Character
- Game Mode Base as
- With 4 classes created, we need to modify the
Project Settings -> Maps & Modes -> Selected GameModeto instruct Unreal Engine to use these entities:- Set
Default GameModeto yourBP_GameModeBase - Set
Default Pawn Classto yourBP_Character - Set
HUD Classto yourBP_HUD - Set
Player Controller ClasstoBP_PlayerController
- Set
Personal Preferences for Playing in Editor (PIE): I suggest to set
Play > Settings > Advanced Settingsand enable “Game Gets Mouse Control”, change “New Window Position” to always center, and finally set the preference to open PIE (Play in Editor) to always open in a new window.
How do you make a character move in Unreal Engine (UE5)? #
At this point, we can play, but our camera will not move. We’ve started a blank project to have a clean slate free of code we won’t want in our game, which means we can’t do anything but render a world.
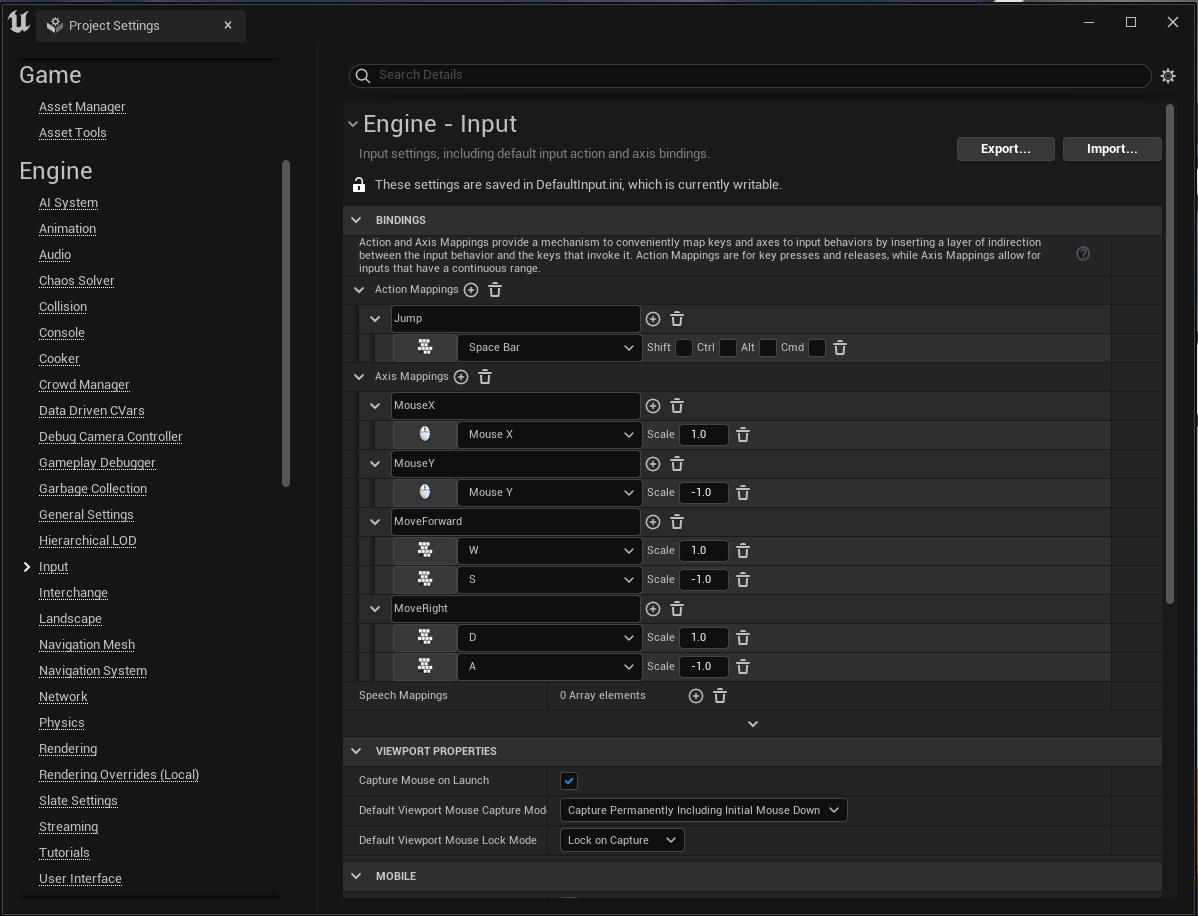
Project Settings -> Engine > Inputwhere we’ll establish Bindings for Action Mappings. We’ll create several of these:- Create the ActionMapping
Jumpand bind it toSpace Bar - Create the folioing AxisMappings
MouseXand bind it toMouse Xwith a1.0ScaleMouseYand bind it toMouse Ywith a-1.0Scale (unless an inverted motion is desired by the player)MoveForwardand bind toWandSkeys with a1.0scale forWand a-1.0scale for S to allow backward movementMoveRightand bind toDandAkeys with a1.0scale forDand a-1.0scale forAto allow left movement.
- Close
Project Settings.
With our bindings established, the time has come to configure our player controller.
- Open
BP_PlayerControllerfrom the Content Browser by double-clicking on it and edit the blueprint – how you edit the blueprint may be different between Unreal Engine 4 and 5. - Delete existing nodes – I observed
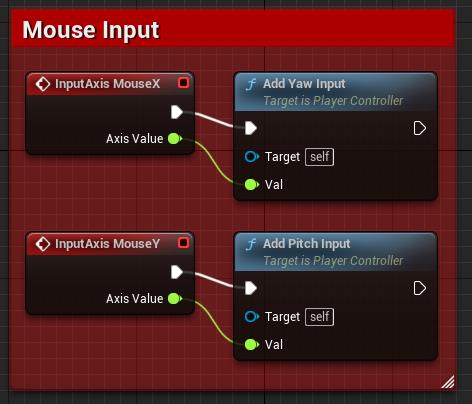
Event BeginPlayandEvent Tick. - Create new nodes for the Mouse Inputs. Right-Click to create new nodes and search for and select
InputAxis > Mouse XandInput Axis > Mouse Yevents. - Add new nodes for
Add Yaw InputandAdd Pitch Inputand wireMouseXYawandMouse YtoPitch.Specifically, wire theMouseX Exec -> Add Yaw Input ExecandMouseX Axis Value -> Add Yaw Input Val.Do the same for theMouse YandAdd Pitch Input. - Select all four boxes and press the
Ckey to wrap them in a comment box and name the box “Mouse Input.” You can customize the comment for quick visual reference by choosing a color or changing the font size. Some people have a preference to disable the option toShow Bubble When Zoomed. Saveand thenCompileyour changes. You can configure a preference toSave and Compile on Success Onlyby expanding the options on theCompilebutton to save yourself time going forward.
Now, we can enable the player to move within our world.
- Search for
Use Controller Rotation Yawin the settings of the blueprint and disable the option. - Create a new Graph called “Movement” to organize behavior related to running, jumping, crouching, etc. The player blueprint can get complex over time, and I want to define clear domains.
- Create the following nodes
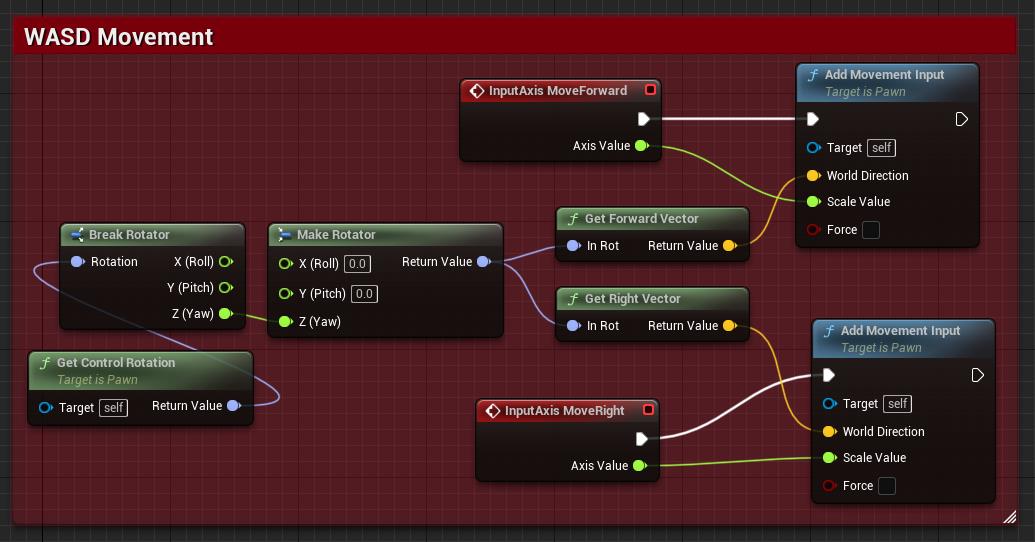
InputAxis MoveForwardand wire toExecof aAdd Movement Inputnode and theAxis Valueto theScale Value.InputAxis MoveRightand wire to theExecof a secondAdd Movement Inputnode and theAxis Valueto theScale Valuelike the previous step. At this point, MoveForward should be wired to one node and MoveRight to another.Get Forward Vectorand wire to theWorld Directionattribute of theAdd Movement Inputconnected to the MoveForward node.Get Right Vectorand wire to theWorld Directionattribute of theAdd Movement Inputconnected to the MoveRight node.- Create a
Make Rotatornode and wire it to the inputs of both theGet Forward VectorandGet Right Vectornodes. - Create a
Break Rotatornode and wire theZ (Yaw)between the two. - Create a
Get Control Rotationnode and wire theReturn Valueto theRotationof theBReak Rotatornode. - Optionally, select all nodes and create a comment to remind you these nodes control the
WASD Movementof your player.
What is all this stuff for? First, lets discuss X, Y, and Z coordinates. These coordinates define three points in a world. If something has a higher X, Y, and Z value, then we know that point is farther right, forward, and higher in the world than another point. For example, the center of a world is probably X=0; Y=0; Z=0. If a point is X=10; Y=10; Z=10, we know it is ten units in all directions away from the center. If another point was X=-20; Y=-20; Z=-20, we know that point is 30 units away from the previous point. Let’s call one of these points the head and another a tail to establish a relationship between these points in space.
With a relationship between two points, we can establish a Vector. A Vector is a mathematical quantity describing two characteristics: direction and magnitude. For example, if we move the head and tail of a line anywhere else in the world, but the head and tail remain 30 units away on the X, Y, and Z-axis, then the vector’s position has changed, but the vector itself has not.
Anyway, this information might help a reader – including myself as I age and forget – to realize that we’ve created two events and bound them to keyboard input. Those events fire, triggering blueprint nodes to fetch vectors to drive player movement as the events fire.
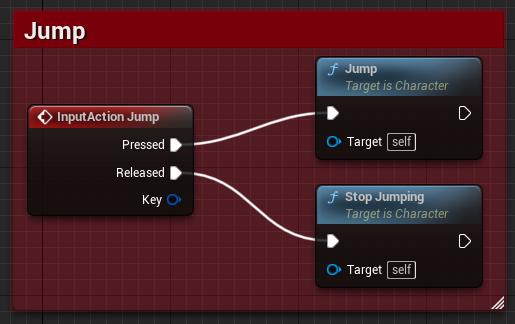
Let’s get onto creating the ability to Jump. Create the following nodes:
- Create
ActionEvent Jumpand bindPressedto a newJumpnode andReleasedto a newStop Jumpingnode. - Optionally select and comment to group the jumping behavior.
Start a Heads Up Display (HUD) #
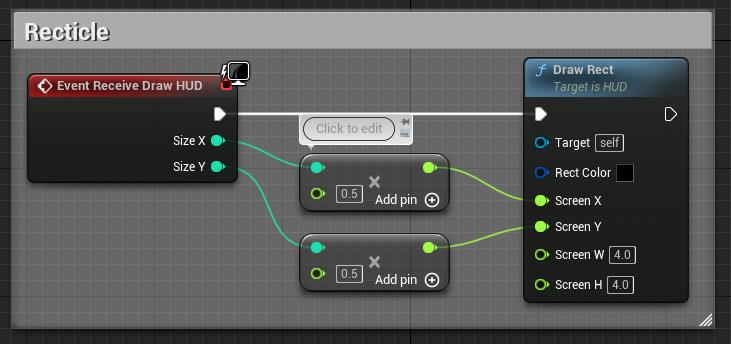
With player controls configured, let’s move on to our HUD where we’ll define a blueprint to render a small box in the center of our screen as we prepare for a reticle.
- Open
BP_HUDfrom the Content Browser - Create the following nodes:
Event Receive Draw HUDandDraw Rect. - Drag a wire from
Event Receive Draw HUD > Size Xand release the mouse button to pull up the new node list and type*orMultiply.Connect an outgoing wire toDraw Rect > Screen Xand then set the multiplication to0.5. Repeat for theYattributes of the two nodes. This formula divides the width and height of the screen in half to find the center. - Set the
Screen WandScreen Hvalues to4or another number of your preference. These values define the size of a rectangle rendered to the center of the screen. Choose25if you want to see a big rectangle. - Optionally, wrap the nodes in a comment. I named mine
Recticle.Save and Compilethe Blueprint. - Play in Editor (PIE) and observe.
Outcome #
I’ve learned and documented how to use Unreal Engine 5 to create a new project from scratch, how to draw a rectangle to the HUD at the center of the screen, and how to move the player around in the world and jump. Unreal made this very easy using Blueprints. Soon, I’ll endeavor to control player behavior using C++ to enable me to have very good control over the player. Should they move the same speed when swimming in water? Will some textures slow the player? Will the player enter a resistance field that adds friction? Find out when Call to Main is published in the distant future.
Explanation of Terms and Entities #
What is a GameModeBase? #
A GameModeBase defines the game. It governs the rules, scores, governs actor existence in the game type, controls who may enter the game, etc. In a multiplayer context, the GameModeBase should only be deployed onto the Server to avoid cheating.
The engine chooses the GameMode actor in the following order:
- The URL
?game={GameModeAlias} - GameMode Override defined within World Settings
- DefaultGameMode entry set in the game’s Project Settings (which we established in the notes above).
GameModeBase References:
- [Setting up a Game Mode] in Unreal Engine Documentation
- [AGameModeBase] in Unreal Engine C++ API Reference
What are ActionMappings and AxisMappings? #
ActionMappings bind or map a specific button or keypress to an alias name that you can bind event-driven behavior. The outcome is that pressing, holding, releasing, etc., a button will trigger some game behavior. Like move forward or jump. AxisMappings are similar but communicate position information such as mouse movement. AxisMappings are continuously polled for a value — even if that value is 0 because you are not moving a controller.
ActionMapping References:
- Input in Unreal Engine Documentation